


There are several ways to keep a starter, relating to it’s thickness:
- a “wet” starter which is like a thin cake batter
- a thick pancake batter type, as seen in the photo above
- a stiff starter that looks like a ball of bread dough
There are advantages to each but for our purposes in this post, we’ll use the more common ‘thick pancake batter’ type. We’ll also be keeping it at what’s referred to in the bread world as “100% hydration”. This simply means your starter has 100% of the flour’s weight in water weight. If you use 163g of flour, you add 163g of water; if you use 47g flour, use 47g water. Your flour’s weight is always the base and your water is the percentage of that weight.
You’ll possibly see other percentages of starters, like 65% hydration starters which are more dough-like since the water weighs 65% of the flour’s weight, therefore less water than flour. This hydration level is in the area that a regular bread dough so you could actually knead it, it is that thick.
You may also see higher hydration levels, like 125% or even more, making the batter thinner. I just wanted to touch on hydration percentages because it seems to pop up a lot in the bread world.
One great thing about 100% hydration starter is no matter how much you use, you’ll always know that it is half water and half flour so it’s easy to adjust any recipe.
Ok, so we have a live starter that’s bubbling and expanding to about twice or three times its volume on each feed. This can be a starter someone gave you already mixed and going or a starter you got in dried form that you’ve woken up. It may even be your own home grown from scratch starter but in all cases, we’re assuming we have an active one.
So how do we feed it? We’re going to use a simple 30-60-60 formula for normal feeds in this situation. These amounts may well change when it comes time to bulk up your starter in preparation to adding it to actual bread but for normal feeds, it’s 30-60-60. What does that mean?
Simply, we’ll take 30g of the old starter and discard the rest (dont’ worry, there’s stuff you can do with it) then add 60g of lukewarm water (~85ºF or 29ºC), whisk it up, then add 60g UAP (Unbleached All Purpose), stir to get all the flour wet, then return to the jar. And that’s as ‘tricky’ as regular feeds get.
A word on starter quantities:
In this example, I’m using 30-60-60 for a total of 150g of final starter which gives you about ¾ cup (150 ml) of starter, before it expands.For my own starter, I keep an even smaller amount: 10-20-20. This gives me 50g of starter (this is less than ¼ cup/50 ml) and lets me use the 40g of “excess” at feeding time to build my levain when I make bread. I only use 20g of flour per feed, barely one heaping tablespoon. This means less used flour put into the compost (if I don’t happen to be making bread) and of course less cost in flour.
There is little reason to keep quarts – or even cups – of starter, unless your bake a lot and in rather large quantities nearly every day. A bigger amount of starter will be no more active than a small amount; it will just use up more flour to keep and feed, and take up more room in the fridge.
The principle of the mixing remains the same whatever size starter you choose to keep.
Let’s take a look at the process.
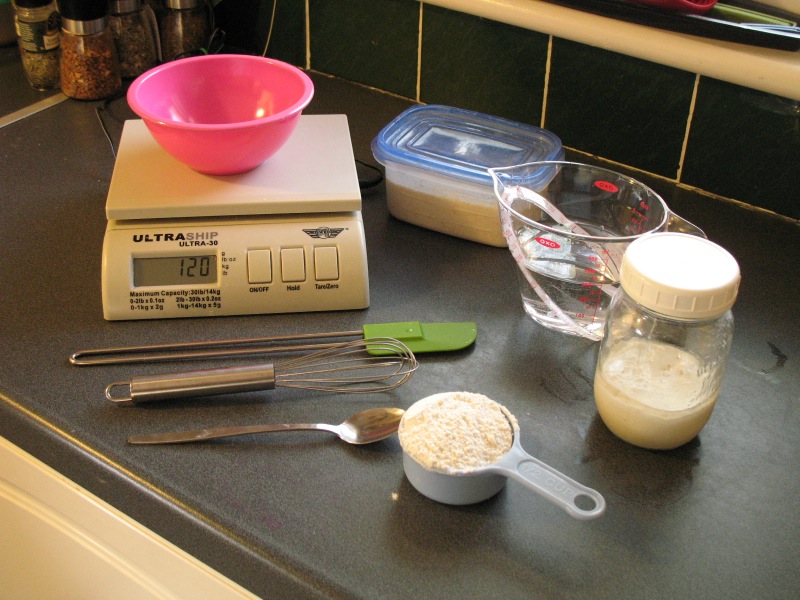
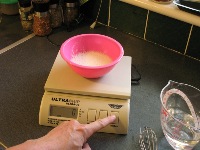
Clockwise, we have a scale, an “old starter” tub, small bowl, water at room temperature, about a half cup of unbleached all purpose flour, spoon, whisk and rubber spatula.
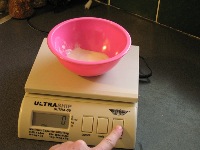
Step one:
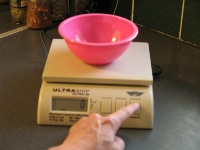
Put the bowl on the scale and “tare” it, which means it sets the weight back to zero even though there’s something on the scale. This lets us measure ingredients as we’re adding them. If you have a mechanical/spring scale, just keep track of three numbers: 30 grams, 90 grams (30 + 60) and 150 grams (30 +60 + 60)
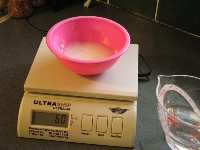
Step 2:
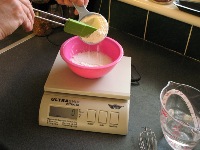
Add some of your previous starter to the bowl until you get 30 grams. Depending on if your yeastie beasties chowed the previous feed completely or were just finishing, your old starter may be quite runny or a bit gluey like ours here – our starter had peaked and was on it’s way back down but not entirely used up.
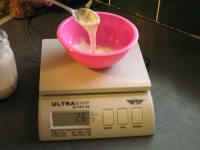
Step 3:
Pour the rest of your old starter into your old starter tub. This can be used to make pancakes, English Muffins, pizza dough, or just added to other baked goods for a bit of flavour. If you’ve already got plenty (like we do here) next time you could just put it in the recycle bin. It’s just a quarter cup of flour, nothing to get too upset about. Go and rinse out the jar in cool to warm water so it’s ready to take the fresh starter in a minute. It doesn’t need to be sanitized or scrubbed, just a decent rinse is fine.
Step 4:
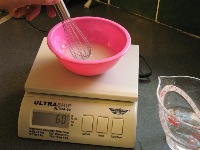
Again we tare the scale back to zero and now add the room temp water, 60 grams. This is then whisked to mix the starter well until you have a bit of froth which adds some oxigen to the mix.
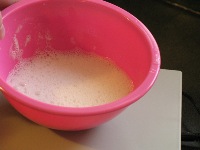
Step 5:
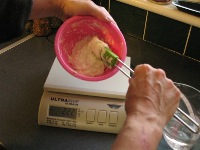
Once more we tare the scale back to zero and this time add our unbleached all-purpose flour until we have added 60 grams, then we take our spatula and stir the goo up. Note that it’s not 100% smooth which is fine, the yeast will take care of that while they’re chewing up their lunch.
Step 6:
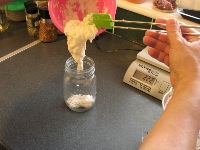
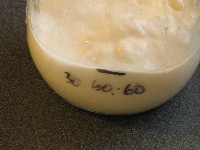
Finally, we return the new starter to the jar, place the lid on (loose or tight doesn’t seem to make much difference). Note that we’ve marked the jar so we know where the starter level is. Once it’s doubled in amount as it eats, you’ll be able to tell how far up it’s gone. We’ve also put “30-60-60” on the jar to remember we added 30 grams of old starter and 60 grams of water and flour. Now the jar is ready to be placed somewhere warm (21 – 27ºC, 70 – 85ºF) to feed and grow. Eventually, you’ll need neither of these reminders but they may help for the first while.
When you’ve been feeding your starter about every eight hours and can pretty much be certain it’s consistently performing feed after feed and doubling or tripling in that eight hours (or less), you can then consider putting the starter in the fridge. This slows the activity in the starter right down but does not stop it. So it may not seem very active while it’s in there but the beasties are still having extended midnight snacks and you need to feed it once a week or so. If you make bread each weekend, use that as your opportunity to feed and get a dough starter set up at the same time.
Let’s also talk terms a bit.
MOTHER: The starter you keep either fed 2-3 times daily on the counter or weekly in the fridge is called your “mother” starter because it supplies you with children starters for your dough. This is your “go to” starter and you’ll want to see to it it keeps fed and well maintained. You may also see it referred to as your “main” or “chef” starter. (There’s a lot of loose terminology in starterland.)
LEVAIN: When you take some of your extra or discard from a recent feed and build this up to the quantity of sourdough culture your recipe needs, this is called the Levain. In most of my recipes (I tend to use the Jeffrey Hamelman formulas a lot) they almost always start needing just 30 grams of “Mother” which then get built up to, say, 395 grams of levain.
HOOTCH: If you go away for a week or three, Mom will survive ok in the fridge although it may develop a rather funky odour and build up some “hootch” – yes, hootch as in booze – which is an alcohol byproduct from your bacteria. It shows up once your critters have eaten all the available food in your last feed and it just means “We’re hungry!” and they’re due for a new feeding. A small amount of hootch can be stirred right back into the batter; if you have lots of it you can pour it off then stir any remaining back in. It’s a natural process of the yeast/bacteria activity and isn’t harmful, though it doesn’t taste good so don’t drink it.
How often to feed? If your starter is very active, every 8 hours may not be a bad schedule although 12 is OK as well. Don’t starve your starter, it’s still a living community of critters and they want to eat or they’ll begin to really slow down/go into hybernation.
FORGOTTEN STARTER: If you forget your starter in the fridge for a long stretch of time (a few weeks or even months) you can still revive it by carefully taking out a tablespoon or two from the center – it may be discoloured and grey on the outsides, so scrape the outside bits away to get to the light stuff in the middle – and giving it a standard feed. If it’s been starving for a while, keep it out on the counter and feed it on a 12 hour cycle for a couple rounds so that it has time to re-populate the new batter mix. Once it looks active again, switch back to 8-hour feeds for a couple of days and when it’s looking back to health and expanding on it’s regular schedule, it is ready to make bread and/or go back in the fridge and eat once a week. The bottom line is that the longer it’s been neglected, the longer you’ll need to coddle it on the counter to get it back to speed but it will eventually bounce back. It’s rather difficult to actually kill an established starter, other than by baking it.
VACATION MAINTENANCE: This means you’ll be quite fine to take a vacation for a few weeks without worrying your starter will die while you’re gone or having to instruct the neighbour on starter feeding. Things you can do are:
- Switch the starter to a stiff starter in the 50% range. This would be 30g of old starter, 60g water and 120g of flour. This will give you a stiff dough ball; you may even have to knead it for a minute to get it well mixed. Pop the ball into a clean jar, let it sit out for an hour or two then into the fridge. Your critters will have a lot of food available and the lower water amount means they won’t be travelling through it as quickly. More food, less water, slower eating = carefree vacation time for you. When you get back, just take a small nub of this dough and use that as your “normal” 30g old starter in a regular feed.
- A week or so before you go away, dry some of your starter excess. Then no matter what happens to your active starter, you’ll have some flakes to revive should you need to when you get back.
(You should do this anyway every 6 to 12 months, just as backup insurance.) - Don’t fret. Plenty of people lose interest in their starter or simply forget and it sits in the back of the fridge for several months. It may get abused some this way but a judicious scooping of the best goo in the middle of the jar and a little attentive care for several days will bring it back to its old self. Bottom line is: a week or three unattended is not the end of the world for your pet yeaties.
I’m likely leaving a few points out of the descriptions here so don’t hesitate to ask questions about regular feeds in the comments bellow if there’s stuff that need clearing up. if I don’t know, I’ll happily research and post back.
CLEANUP TIP: When feeding or working with sourdough starter, try to put your tools into cool water as soon as you’re done with them since dried flour/water paste is a MAJOR PAIN to get off things. It IS used as glue, after all.
When you store your starter in the fridge, and you feed it once a week, when you want to make bread, you use a small amount of the old starter, or first you feed the starter as you described above, and when it’s active (double or triple in size), you take the small amount required for the recipe, feed it again as instructed in the recipe and put the rest back in the fridge? this way your mature mother starter is always white flour, 100% hydration, but the levain for the bread can be build stiff, liquid, rye, etc. Is that correct?
codruta
Yes, that’s how I do it, anyway; other people may use a different process. I never actually use the mother starter directly because, since I don’t bake with it regularly, it pretty much lives in the fridge and would need a feed or two to get back up to speed before using anyway. I therefore use the excess from that last refresher feed as the starter used in the recipe.
Hamelman’s recipes all note that you put that first bit of starter in the build, then once it’s ready, take it back out, supposedly to add back to your original starter; I never bother. It’s just 30 grams and in a 1500 gram ball of dough, won’t make much difference. But I suppose I could pull out a heaping teaspoon of that built up starter and drop it into the “excess pancake starter” jar if I thought it would interfere.
it’s not quite what I answer, but it is my fault, I’m not very good explaining in english.
I have a starter for more than two years and I keep it in the fridge. I bake bread once a week. I never knew how to feed it properly and for almost 2 years I underfeed it, cause I never discarded any of it, and I usualy I put a lot of starter in my dough, cause I didn’t know what to do with all that amount, and waisting it was out of the question. (funny, though, bread was always good, good rising, good taste, maybe once in a while too sour).
First time I opened my eyes was a year ago, wihile reading susan from wild yeast, in the post where she explain how she maintain her starter. But she kept hers at room temperature, so my situation was different and I was still uncertain of what should I do. What really helped me, was your post, I read it a few month ago, and it pretty much changed everything. At that time I didn’t have Hamelman’s book, and I made recipes from different blogs, but my daily bread was norwich sourdough from susan’s blog (she uses “360 g ripe 100% hydration sourdough starter”, so when I fed my starter, I removed 360g, and that was my levain) After readind Hamelman’s book, I made another step forward, but one question still remained that I couldn’t find the answer to. The mature culture that he refers to when building the levain, comes from the freshly fed mother starter, or may come from the unfed mother starter kept a week in the fridge.
And another question: why do you keep the excess from the lasts refresher feeds? only for pancakes, I assume. If I don’t want pancakes, is ok to just throw it away, right?
sorry for the looong comment
Hey again. First, no need to apologize for either the length of the post or the language; you’re a million times better at English than I am at French which I grew up using.
OK, to your two questions; I will rephrase them here to make sure I’m understanding your point.
1) Make the recipe’s needed “Levain Build” from a mother starter right out of the fridge or freshly fed?
I’d suggest always giving your refrigerated mother starter at least one feed after coming out of the fridge, better yet two. If it’s been in there a long time, like it was forgotten for many weeks, maybe even three. Then use the excess from that last feed to build your Levain Build.
Making a levain Build from a starter right out of the fridge uses yeaties and lacto that are still very sleepy and not up to speed; their balance is a little bit off since one hibernates and the other sort of get too much run of the jar and is a little too concentrated. Doing a feed or two before using gets them back to “normal” routine and balanced.
2) What to do with the excess?
If you aren’t going to use the excess in other baking for a while, indeed it’s fine to discard it, preferably in the compost/recycling or the garbage but not down the sink. Because you won’t be keeping giant bakery-sized amounts of starter, the quantity you will toss out should be rather minimal. So even if you toss out 50g of extra starter at each feed, that’s still just 25g of flour, not a lot. PLUS keep in mind you’re not taking 25g of flour out of the bag and throwing it away directly, that WOULD be wasting it: it’s been used for feeding your starter so it’s had a legitimate use and has even been changed chemically by the yeasties eating it up. Sure, it’s nice to keep for other baking but if you don’t end up using it, there’s no point keeping it. I myself keep it for a few weeks and if I don’t end up making pancakes or whatever, I don’t worry about it and toss it in the compost, I’ll have more to use in a week or so anyway. Again, remember that this is “used food” – just as I wouldn’t worry about tossing the cat’s litter box away after I fed it nice cat food.
Now if you keep enough starter to get 360g of excess at each feed because that’s the amount you need for your normal Norwich recipe, you may want to think about cutting the Mother down to a different size. If you were to keep it to, say, 50g and make this up using 10g starter and 20g each flour and water, that would give you 40g of excess per feed. You can then build that up in one or two feeds to the full 360g, like so:
40:40:40 first refresh,giving you 120g, then do 120:120:120 giving you 360g
This is perfect for your usual recipe. Yet you only need 20g of flour to feed your Mother starter, which you would also feed separately then get back in the fridge once it had expanded nicely.
Hope this explains what I’d suggest well. If not, don’t hesitate to ask for more info! You are always welcome to post comments and questions.
And as you can see, I have no problems with long posts either! 😉
for point 1) That is exactly the procedure I use, since I first read this post, a few month ago, as I said before. You just comfirm that i’m on the right track here. Two days before the day I want to bake bread, (that is once a week) I take the starter out of the fridge, discard all but 20 grams, which I feed with a ratio of 1:3:3, so I end up with 140g of starter. I let it at room temperature, until it reaches it’s peak and is fully ripe, I remove a small quantity required by the recipe (usually 10-20grams), and put the rest in the fridge, till the next week. With the small amount I build the levain as instructed by the recipe I’m using (usually from hamelman’s book).
that is how I procede, and I hope it is a good way of taking care of my starter.
2) In the past, I had a great difficulty to accept the fact that I have to throw away a good starter, in order to keep it vigurous and healthy. But after reading susan’s post, and then yours (the one with The Waste Conundrum and A mathematical view), i finally understood that we’re not talking waste here, but perpetuating a species in optimal conditions. You helped me more than I could say, unfortunatelly it took me two years to find you.
As for the norwich sourdough recipe, I don’t use it since I have hamelman on hand, I just switched to Vermont Sourdough (which in fact was the source of inspiration for Susan in the first place).
You explained everything very well, thank you for taking the time and the patience. 🙂
codruta