

What I’m about to list here is what I’ve managed to collect so far or feel I need to cobble together a useful bread making set up. It’s not necessarily ALL the toys and gadgets and must-haves one must have but it’s what seems to be a decent starting point. Anyone who cares to suggest/recommend other useful tools is welcome to add a comment below describing the item and why they feel it’s a good addition to the break maker’s toolbox.
You’ll also see some links to “Get this tool here” which will send you to your local Amazon site to purchase that item. Note that I am not specifically suggesting the items linked here; they are just examples of the tools in question. You can probably find most of these at your local retailer and perhaps at a better price than offered by Amazon. Plus, buying from your small, local kitchenware shop helps your neighbourhood economy.
1- Kitchen Scales
[amazon_link asins=’B01C465Y8U,B004164SRA,B00F3J9EGO,B018LXSPEA,B00VEKX35Y’ template=’CopyOf-ProductCarousel’ store=’rainbowzoneco-20′ marketplace=’US’ link_id=’3ffdec13-ef7f-11e7-8b3c-7b42fcd9fc45′]
As mentioned elsewhere, a kitchen scale is nearly mandatory if you want to make consistent breads. Or most baking requirements, for that matter. Because baking, unlike cooking, is to a large degree a science where you mix specific amounts of particular ingredients which, when exposed to specific heat levels or interact with each other, cause particular changes and effects. There’s a reason, for example, why the combination of baking soda and buttermilk in cakes works: the acid in the buttermilk reacts with the soda to cause carbon bubbles, thereby expanding the batter and giving you a nice open texture as the batter bakes to a solid form when the sugar and flour molecules bind together. This is science. Yummy, tasty and chocolaty science but science none the less.
A scale allows you to control very precisely the amounts of each ingredients in a recipe so that you not only get the expected effect but can repeat that process over and over. You also want to be sure the scale can measure right down to 1 gram increments. A long auto-shut off is also handy; most switch off after 30 seconds of inactivity which is really too short when you’re actually doing stuff. A minute or even two would be awesome. But don’t NOT get one just because the shut off is too short; you can live with that.
For a more in-depth discussion of scales and what to look for when buying one, read my post “Digital Scales: Which Weigh To Go?”
2 – Oven Stones
[easyazon_image add_to_cart=”default” align=”left” asin=”B004ZLY3US” cloaking=”default” height=”107″ localization=”default” locale=”US” nofollow=”default” new_window=”default” src=”http://ecx.images-amazon.com/images/I/41pVb-bnh-L._SL160_.jpg” tag=”yumarama-20″ width=”160″]
This one isn’t precisely mandatory and some people may even prefer to not use them but oven stones help to keep your oven at a more average temperature as they have a lot of thermal mass; when you open your oven door, the hot air easily flushes out and without stones, you’re left with the element or gas heat to bring the oven temp back to what it should be. With a stone, it holds plenty of heat and isn’t as easily cooled off so the oven temp gets back to “average” a lot sooner.
An oven stone also helps in the cooking of the bread as it comes in contact with a very hot surface quite suddenly. This immediate contact with a hot base will give your bread plenty of oven rise.
[easyazon_link cloaking=”default” keywords=”oven baking stone” localization=”default” locale=”US” nofollow=”default” new_window=”default” tag=”yumarama-20″]View several oven baking stones here[/easyazon_link]
3 – Reliable Oven Thermometer
One can never assume that their home oven’s thermostat is accurate. When you set it for 400°F and, after several minutes, it beeps to tell you it has now attained that temperature, it’s very likely lying. Heating an oven should take easily 15-20 minutes to let the heat soak into the oven walls and, hopefully, the stone (which would add another 10-15 minutes to the preheat). That aside, home ovens are notorious for having hot and cool spots so the top left back may be 400°F but the front bottom right may not. This would mean different loaves in different spots in your oven will cook at different rates. You do want o get into the habit, no matter what, of rotating your trays midway through baking to help even out this hot/cool spot issue.
All this aside, you also can’t trust the accuracy of that thermostat and need to actually check your oven is in fact 400°F when you pop those loaves in. There are a few different types of thermometers one can purchase to see what temperature your oven really gets up to: coil, glass tube and infrared guns.
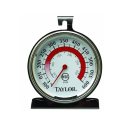 The most easily found is a standard dial thermometer which hangs off one of the racks, has a glass front and a dial that eventually turns to show you what your oven temp is. These are ok but just ok. They can be off a bit from the actual mark and it is hard to calibrate them to a set temp for accuracy. However, they are found anywhere and are pretty cheap, running at about $5. I’ve run into some that were dead on the mark, others that were off by 10-30 degrees.
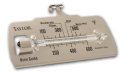 The glass tube type may be harder to locate and you may need to order it online. These are like most tube type thermometers in that they have a small glass tube with some coloured liquid inside, the heat makes the liquid expand until it reaches a set mark on a metal plate that tells you what the temp is. The downside to these is that they are a bit fragile, being glass, and the only one that seems to be generally available, made by Taylor, seem to suffer from the printed markings disappearing after being in the oven for some months. These, however, are much more accurate than the standard dial types.
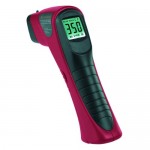 The infrared guns are on the slightly pricier end, starting in the $20 range, but work quite well. They are, of course, not left in the oven while baking but you can open the oven door, point the laser guide at something in the oven, like the back wall, and see what temperature it has been brought up to. It cannot read the air temperature. And although not typically noted, it will need calibrating now and again. When purchasing one of these, you do want to make sure that it can be reset, usually by pointing it at boiling water which is 100°C and pressing the button combination to adjust. You also want to be sure the thermometer reads at least all the way up to about 550°F (290°C); most will but some do not.
oven thermometers
Shaping containers
4a – A Couche

What is a couche (pronounced “koosh”)?
A couche is a length of flour-coated fabric into which dough loaves are placed to proof. Typically, a proper baking couche is made from raw linen of a substantial weight and it often is dusted heavily in rice flour or a mix of rice and bread flour. The benefits are that the dough loaves, tucked in between accordion-like folds, have a little bit of the moisture on the outside drawn into the fabric while the flour allows for its easy removal once the bread has proofed.
You can purchase genuine couche linen online at the San Francisco Baking Institute’s shop or you may, with a great deal of luck, be able to find it in a very well stocked fabric shop. This linen is heavy, unbleached and generally untreated. To quote the SFBI site:
“Made of natural flax fibers with no chemical color or setting used, linen is the best material for proofing breads. Linen is very durable, but flexible and light, which allows the folds needed separating the shape of dough. Shaped loaves of bread are placed in between the folds of linen to help the bread maintain its shape during proofing, reduce the amount of space needed in between the loaves, and prevent the loaves from proofing into each other. Linen will absorb the excess moisture of the dough and minimize stickiness during proofing or overnight retarding but will not dry it out, giving a nice thin crust. The fabric can last forever if scraped or brushed after every usage, and then hung to dry before using again. If washing linen, it must be cold water and hang dry.”
Another possibility: Cotton canvas. You again want an untreated, plain heavy cotton. One such source would be an art store where they sell painting supplies. In fact, their artist canvas might even be linen. But it could also be plain cotton canvas. It should be available by the yard/meter off a roll. Obviously, you want unfinished cloth, not the pre-treated, pre-painted type.
A likely easier to locate source is your local paint store. Look at their drop cloth section, you may find large sheets of plain heavy cotton for quite cheap. It won’t be quite as nice as real linen but will do much better than, say, a kitchen dish towel. You can probably get away with a 5 x 12 foot drop cloth which you can then cut into three or four 18″ by 36″ pieces, a good size for the usual home baking pans of 16″ by 12″. Whatever you have leftover can still make a handy drop cloth next time you paint.
What about cotton dishtowels? Some people use them but I’ve always found their slightly fuzzy surface clings too easily to the wet dough, and they’re quite small for making folds between loaves.
Rice Flour: Rice flour is like teflon for dough: it just doesn’t stick to the bread. You can find it in bulk ingredient shops or perhaps even at the supermarket. Some people use it straight up while others blend it with All Purpose or Bread flour. I’ve seen a few suggestion as to what sort of mix this needs to be, 25%, 50% or 100% rice flour to AP, then rubbed well into the couche’s surface. I did 50/50 rice to AP and it worked perfectly. Apply very generously. Don’t wash the couche after each use – or ever, according to many bakers – just shake the excess off (outside recommended) and allow the cloth to dry as it will have absorbed a bit of the moisture from the dough.
4b – Proofing Baskets: Bannetons and Brottforms
 These are used to let the bread rise in round or oval/long shapes. There are generally two styles: a linen-lined cane basket and a thick coiled cane basket. The terms “Banneton” and “Brotform” mean the same thing (French and German, respectively), although some people use one for the linen type and the other for the coiled cane while others will use the opposite; which one for which varies. Neither is wrong.
Linen-Lined Basket
You’ve seen these in lots of trendy home decor shops, baskets lined with a cotton material. Now for actual bread making, the baskets that inspired all these chi-chi type copycats, you simply need a sturdy wicker basket, round or oval, loaf sized with good linen or similar material lining the basket to avoid dough sticking to fuzzier material. This cloth insert can be either stitched right to the basket weave or simply laid in and secured with elastic edging. The latter, being removable, is easier to wash should there be a need. However, allowing a dough-crusted basket to dry and then using a somewhat stiff scrub brush would also do the trick without causing shrinkage – remember that it is not recommended that linen liners or couches get washed; it sorta destroys their surface texture.
Coiled Cane Baskets:
[amazon_link asins=’B01EQL2EYI’ template=’ProductLink’ store=’rainbowzoneco-20′ marketplace=’US’ link_id=’69493980-ef83-11e7-a4f7-e7712dadacef’]
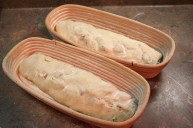
These are, again, round or long oval baskets but this time they’re not basic wicker but (usually) willow reed wound around and nailed together to make a solid basket. These impart a very distinct pattern onto the dough when you flour the inside liberally, as seen in this image from TheFreshLoaf.com. The reed leaves an indentation and the ‘valley’, filled with flour, transfer this to the bread’s surface. Quite nice and extremely “artisanal” in look.
[easyazon_link cloaking=”default” keywords=”banneton” localization=”default” locale=”US” nofollow=”default” new_window=”default” tag=”yumarama-20″]Check out some Proofing Baskets here.[/easyazon_link]
5 – Bowl and Bench Scrapers
Both of the following tools are pretty much indispensible when handling your dough. And they’re pretty inexpensive.
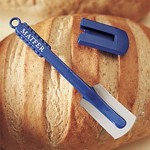
Plastic Bowl Scraper:
[easyazon_image add_to_cart=”default” align=”left” asin=”B000KEUKO2″ cloaking=”default” height=”160″ localization=”default” locale=”US” nofollow=”default” new_window=”default” src=”http://ecx.images-amazon.com/images/I/31uyS3MoUxL._SL160_.jpg” tag=”yumarama-20″ width=”160″]These standard tools in any bakery seem to be very difficult to locate in brick-and-mortar retail stores. However, they can be found online rather easily. The problem is that, although relatively inexpensive – you can find them for under a dollar – getting them shipped is comparatively insanely priced. So find a supplier and build up a decent order to which you can then add this item.
Alternatively, you might be able to convince you local bakery to nab you one or two. Maybe. It used to be that suppliers would give them away to bakers as a small “gift” and they’d end up with plenty of extras. However, now bakery suppliers would rather charge for these, even if they have their company name on them and they are actually promotional items. Things aren’t what they used to be.
And, IMHO, anyone who charges over $2 (before shipping) is trying to rip you off. Find a big plastic bucket lid and cut one out for yourself if you must. One straight side, one nicely curved. This makeshift version worked for me for the first while until I had a big enough order with one supplier to pop a scraper on top.
[easyazon_link cloaking=”default” keywords=”bowl scraper” localization=”default” locale=”US” nofollow=”default” new_window=”default” tag=”yumarama-20″]Find a few Bowl Scrapers here.[/easyazon_link]
Metal Bench Scraper:
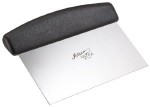 For scraping the counter top clean as you’re handling wetter dough or cutting lumps of dough into sections, a metal bench or pastry scraper is the tool you want. It is usually a simple stainless flat blade with either wood or plastic handle. It works not only to scrape gunk and dough bits off the counter and collect up all the loose flour, it’s also useful for cutting dough chunks and is handier and safer than a big knife for picking up a pile of chopped veggies (when you’re chopping veggies). Now these you can find in nearly any kitchen department everywhere. Score! You can’t scrape the insides of bowls with it though so you would still want the plastic version above. And although you can scrape the counter with your plastic scraper, it will nick the softer edge and wear out quickly, so have both types at hand.
[easyazon_link cloaking=”default” keywords=”pastry scraper” localization=”default” locale=”US” nofollow=”default” new_window=”default” tag=”yumarama-20″]Check out some pastry scrapers.[/easyazon_link]
6 – Scoring Tool
Baker’s Lame:
 A good blade to slash your loaves is required. There are a few possible solutions. One is a “professional” lame (French for blade, pronounced lah-mm) which you can buy as a disposable one-piece holder and blade or as a handle with replaceable blades. These generally need to be ordered from specialty shops.
Some people fashion a similar tool from a coffee shop wooden coffee stir stick (Starbucks, in other words) and slip on a double-sided “safety razor blade” you can buy at any drug store or grocery, next to the shave cream.
The one-piece disposable units are going to get expensive pretty fast since a blade won’t last that long. It is best to buy the single blades, either online or, if you live in a big enough city, a barber/beauty shop supply house, in bulk. Then devise yourself a simple handle, slip on the blade and off you go. Only a few pennies each new blade and keeping it fresh will assure a nice, clean slash. Get too stingy and hold of on changing the blade and you will soon see issues creeping up, like jagged cuts, sticking dough, etc.. A fresh blade will do dozens of loaves and then there’s the other side you can use. For small run home baking, I’d suggest every other batch/baking day should get a fresh blade.
Alternatively… a Tomato Knife:
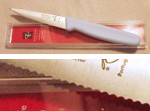 Another way to slash your loaves is by using a small, serrated tomato knife, a short knife but (and this is the trick) with scallops in the blade. Pictured here is the knife I found at the local grocery store, cost just $2. Works great! Be warned, however, don’t get a knife with those very tiny “micro serrations”, you need small but definite serrations. Click the picture at left for a larger size.
[easyazon_link cloaking=”default” keywords=”serrated tomato knife” localization=”default” locale=”US” nofollow=”default” new_window=”default” tag=”yumarama-20″]Get a small Tomato Knife here.[/easyazon_link]
7- Transport
Bread Peel:
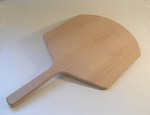 Indispensable in any bakery and certainly a highly recommended addition even for home bakers, the bread peel is a handy tool for getting your soft, proofed loaves from here to there.
The more widely available version for home bakers will be a wooden pizza peel, as seen on the left. If you have a choice, get one that is somewhat wider, about 16″ wide and long, not counting the handle. The handle length will depend on the space you have in your kitchen and in front of your oven. Get one that’s more square at the front end; you’ll find there’s a great tendency to make that edge quite round which may be great for pizza, not so much for bread loaves. If you just can’t find a less round one, go with what you can get, it is still better than nothing.
There is another player in this game you might see in your search for a peel. The Super Peel, shown here on the right, has a non-stick cloth cover that becomes a small hand-held conveyor belt tool with unrivalled pick-up and transfer abilities for any dough you are working with. Watch this quick video:
[youtube]http://www.youtube.com/watch?v=XCM0gTOSHXU[/youtube]
[easyazon_link asin=”B001T6OVPO” locale=”US” new_window=”default” tag=”yumarama-20″ add_to_cart=”default” cloaking=”default” localization=”default” nofollow=”default” popups=”default”]You can get the official SuperPeel here.[/easyazon_link]
[easyazon_link cloaking=”default” keywords=”Pizza Peel” localization=”default” locale=”US” nofollow=”default” new_window=”default” tag=”yumarama-20″]Look through some Pizza Peels here.[/easyazon_link]
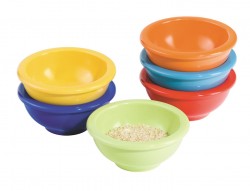
8 – Mise en Place
 Getting all your ingredients set out and pre-measured will save you from the certain error we will all at some point make: forget to add something or find out half way through that we ran out of a particular item and need to dash to the store.
Prep bowls to the rescue! A handy set of prep bowls allow you to do just like you see the pros do on the TV machine: have everything at hand, all measured and ready to add to their recipe. It’s (nearly) impossible to forget to add something because you still have the bowl of it there on the counter. I messed up a couple of times before I decided to make it a mandatory part of baking, bread or otherwise: have the Mise en Place ready. And having a few prep bowls for it means no hunting for containers. (That’s pronounced “Meez ahn Plass”, basically, which translate to “Put in place”.)
The best place to nab these is at the local dollar store; they are often stocked as personal dipping bowls or as a set of tiny serving bowls. They don’t need to be pretty or fancy, just handy, small enough to stash away easily and hold a few tablespoons of stuff. I got my colourful melamine ones from the local supermarket, just $2 for a set of 6. Whether melamine, plastic, glass or silicone, they are darn handy tools to have in your arsenal.
9 – Bread Knife & Cutting Board
It should go without saying but a nice fresh loaf of bread will be tortured if you don’t have a good bread knife. So this should definitely be one of your baking tools, even though it isn’t used in baking. Likewise, you want a good cutting board that won’t damage said knife – sharpening a serrated knife is a professional job so save it’s edge for as long as you can.
[easyazon_link asin=”B001L68AZY” locale=”US” new_window=”default” tag=”yumarama-20″ add_to_cart=”default” cloaking=”default” localization=”default” nofollow=”default” popups=”default”]![]()
[/easyazon_link]A decent bread knife will set you back about $25-$40, a REALLY good one can go, well, sky high. But anything much below that $20 is going to be iffy. The steel used won’t be as tough, the edge may have those dreaded microgrooves and not a good scallop. Spend a little extra if you can and you’ll have a knife that will last you decades. The handle doesn’t need to be fine rare wood either, a plastic handle works just fine. Brands like Victorinox and Henckels make expensive, high end professional knives but also affordable home versions of acceptable quality.
Make use of a wood, bamboo or polyethylene cutting board to keep those teeth from dulling. Either of these are available most anywhere at a reasonable cost and in different styles. If you use one of those glass cutting boards, please do your knives (bread or otherwise) a big favour and ditch that thing right away. A glass cutting board will destroy the serrated blades on your bread knife and just dull your normal slicing knifes.
I like that you talked about making sure you have a scraper to cut and scrape dough. I have been looking for tools to use when I start baking. I can see how it would be nice to have a scraper because my dough usually gets stuck in the bowl.
Hi Scott,
When I started out, I couldn’t for the life of me find a bowl scraper anywhere near where I lived. Amazon had them but for $6 each which was insane. So I improvised. I tool a heavy plastic lid from a plastic container and cut out my own scraper. It was still overly soft (it was luck of the draw what sort of plastic I might have at hand, after all) but it did the trick acceptably.
A bench scraper is metal (usually) and straight edged, so it just wouldn’t do to scrape out round bowls. Great for scraping the countertop, mind you (unless it’s ceramic tile).
Hey, nice post! Maintenance of knives is very essential being an integral part of the kitchen. I love to keep knife blades well sharpened which was made easier for me by Angle Pro Sharpener. It has got amazing knife sharpening tools and gauges, making sure the knife blades are sharpened at correct angles. Highly recommended!