Intro • Day 1 • Day 2 • Day 3 • [Day 4] • Day 5 • Day 6 • Day 7 • Final Thoughts • Day 15
Starter from Scratch: Day 4:
(and once daily until it starts to expand and smell yeasty), mix . . .
2 oz. of the starter (1/4 c. after stirring down–discard the rest)
1 oz. flour** (scant 1/4 cup)
1 oz. water (2 tablespoons)
** You can feed the starter/seed culture whatever you would like at this point. White flour, either bread or a strong all-purpose like King Arthur or a Canadian brand will turn it into a general-purpose white sourdough starter. Feed it rye flour if you want a rye sour, or whole wheat, if you want to make 100% whole wheat breads. If you’re new to sourdough, a white starter is probably the best place to start.
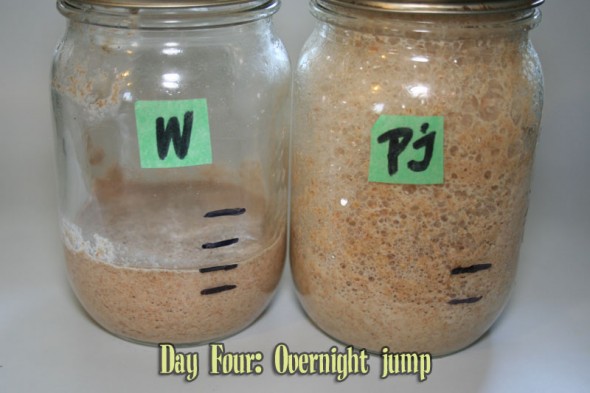
Yowza!! PJ has expanded a huge amount overnight!
When I pop open the lid, there is a distinct yeasty smell though still with a pineapple one. Wally , on the other hand, is still napping, doing what is needed to get the pH in his jar down. OK boys, time to wash up and get ready for your next phase.
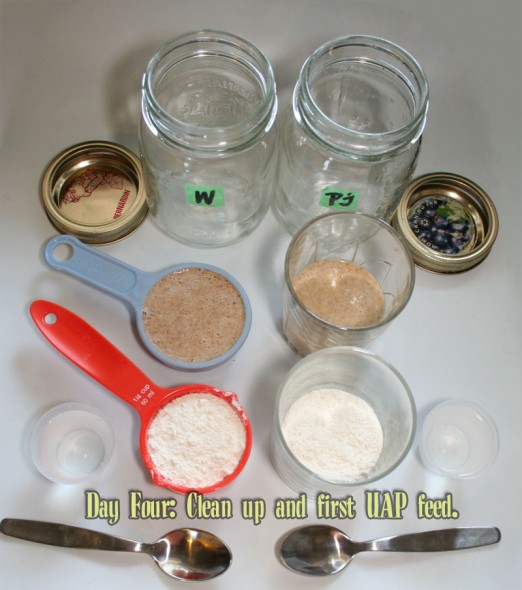
Here I’ve reduced the two starters to 1/4c (2 oz or 58g) and put that in separate containers so I can wash out the jars and lids.
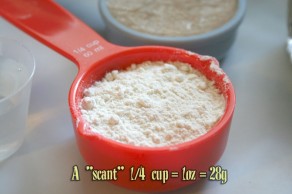 I’ve also measured out 2 Tbsp (28g) water for each jar and a “scant” 1/4 cup (28g) of UAP flour. I’m using separate utensils for each to avoid cross contamination or interference between the two starter. As you can see, the water and flour weights are equal (28g/28g) so we’re building a 100% hydration starter at this point.
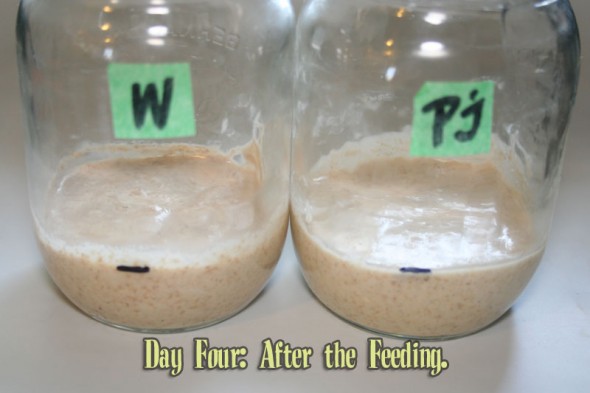
The two lots get mixed up and we then have our first UAP feed.
And yes, Wally still stinks, just a little less so now.
Because this is a process involving variable live cultures, I think it may be better to outline the phases of development, rather than to give a timetable. It’s a natural succession that will progress at its own speed. You can influence it, but you can’t control it — not an easy concept for a baker 🙂 “Relax. Be patient.” You’ll hear that a lot in regard to sourdough.
You don’t have to taste the [pineapple] mixture if the thought really bothers you, but it will tell you a lot about the progress at times when there may be no other outward signs. Lactic acid doesn’t really have an aroma, so you won’t be able to gauge just how sour it is by smell. Taste the initial mixture to get a point of reference and pay attention to the sourness level as you go. Taste it before you feed and decide if it is more sour or the same as after you fed it 24 hours previous. Taste it again after feeding the next addition to compare in the next 24 hours.
Intro • Day 1 • Day 2 • Day 3 • [Day 4] • Day 5 • Day 6 • Day 7 • Final Thoughts • Day 15

Aloha Paul,
I’m on day 4 and you mention giving the “kids” an extra feeding when they use up the food in the jar. With this extra food, do you just add flour and water to the jar? Or do you reduce the amount of starter and use the 1:1:1 ratio? Sorry if this old man is a little dense here… comes with age!!
Mahalo,
Royall
Hi Royall,
Sorry about the very long delay in replying, I guess I missed your post.
At this point, we’re reducing the starter to a small amount at each feed so in this case I discard all but 2 Tbsp of starter and feed as indicated.
I’m guessing this is WAYYY late for you and you’re gone ahead with the starter. I’m sure it worked out in any case. The difference is that by reducing, I’m really cutting back on how many hungry yeasties there are so there’s more food available. Simply adding food without cutting back still gives them more food but it’s shared by a lot more critters. Still, either way means they get more food.
Well, here we are at day four and Mina did not have the massive expansion. Kind of expected that because of the cooler house temps. She did at least almost double. Maybe 1/8th short of doubling. I’m still pleased with her activity.
Thank you Paul for suggesting some options to warm her up some. (Day three comments.) It would be nice if a person could buy a coffee cup warmer with a temp control! That would be soooo nice and easy. LOL
Today is moving day to a different jar, discarding and feeding water and APF.
I am concerned about under feeding her at this stage so I will be giving her extra APF and water so she will make it through 24 hours without going hungry. (1:1:1 by weight) I hope this is not a mistake on my part.
I can say that I’m enjoying this adventure. :>)
Deka
Oh no…I forgot to do step 4 last night…is it too late to do it this am? Gah!
Hey Gwyn,
No, it’s not too late. Starter is quite forgiving and can actually take a fair bit of abuse. Carry on and get back on schedule as best you can and it will work out fine!
phew! Thanks
Hi Paul! So I’ve separated my starter today and added white bread flour but am left with quite a bit of rye starter since I don’t have two experimental ones going. Should I do anything with this or just discard it? Also, on day 5 she talks about reducing to 1:1:1 but if I’ve discarded my original starter how can I reduce my ratio? Shouldn’t it be all my white sourdough starter:1:1? Know what I mean? Can offer some advice? Thanks!
In retrospect, I messed up at this point. I’m not measuring the amounts of stuff I add (as I don’t have a means of weighing things). I switched to the UAP, discarding all but a quarter cup of the starter before mixing it together with some water.
Ultimately, I added too much water, making the starter a bit runny. I ran with it though, and over a couple of days felt like I just wasn’t making any progress (even in light of the “looks dead” period). I even thought for a second that it was regressing back into another “stinky” stage.
I’ve gradually corrected the ratio issue by not discarding any starter, adding and mixing in the flour, and then after that adding water as needed just to be able to mix the flour. The result’s been pretty good. My starter may be a couple of days behind this experiment, but it’s getting bubbles throughout and is slowly migrating over to the proper smells.
Hoping that tonight I’ll be able to get back on track with discarding a bunch of the starter and mixing with flour/water so it can start building its strength.
I meant to add that I think it had difficulty rising due to the disproportionate amount of water in it. It was too runny to hold itself up with bubbles in it. In that sense, I don’t think the good bacteria’s progress was hindered, only my ability to really measure it.
A general rule of thumb, if you are stuck with volume measures only, is that to get close-ish to 100% hydration (50% flour, 50% water by weight) you can use about twice the volume of flour as water. So to ½ cup of flour you’d use ¼ cup water. It would be, in actuality, about 63 g of flour to 60 g water (1 c of water is 237 g, 1 cup of bread flour is about 127 g) which would be “close enough” for feeding purposes.
I have a volume-to-weight conversion chart here that may be useful as a reference until you can get a hold of a decent scale. I update it now and again as I get weights on new ingredients but it lists a lot of the more typical stuff you’d use making bread and pastries.
Meanwhile, do keep an eye out for a good price on a digital kitchen scale. My recommendations for scales can be found in this post here. But to recap quickly: a small scale that uses AA batteries, not the lithium ones as they are short lived and pricey to replace. You want it to use both grams and ounces (which means they also will have kilos and pounds), max capacity of at least 5 kg (~11 lbs) and, if possible, a removable stainless platform so you can toss it in the wash. Amazon has lots of them and they start at around $15 US. I don’t have one particular scale to recommend as they’re US brands that I haven’t seen in person but it would be an easy place to start looking. And if someone is even semi serious about baking, a decent scale is a very important tool to have in your baking toolbox.
I’m happy to see that you noted the issue was the water and didn’t let this stop your progress. Keep at it and you’ll soon have a decent starter to call your own!
I’m on moning of day 4 and mine is just showing a couple bubbles in it but no rise. Should I keep going with the day 1-3 feeding until it shows some rising power or start with day 4 feeding tonight?
Hey David,
You could probably add another 2 Tbs of your Step 3 flour, but use 2 Tbsp of water this time. I’d say keeping to modified Step 3 may be better because you’re ADDING to however many (and relatively sparse) critters are in your mix now. It will probably go nuts sometime today or overnight and then you can do a full-on Step 4 feed next time.
Best of luck with your new pet!
Thanks Paul. Hopefully it starts soon. It’s been cool here so that’s probably slowing things down a bit. Otherwise things seem to be going well!
Two days later and,still no activity 🙁
I keep it in a mason jar and when I turn the lid you can hear the gas escaping. But no rise :(. Is,if possible that it’s just too cool for it? It’s been probably 60-70 in the kitchen, not cold refrigerator temps. I wonder if I just got some dud rye flour.
It may well be that your room is too cool to have bred enough critters for an active colony quite yet. It will get there eventually.
Still, you may want to get your starter into a spot that is warmer than the mid-60 range. Try the following and see what makes sense in your particular set up:
• On top of the fridge, at the back where the heat from the coils rises. This is generally the most accessible warm spot for most people.
• In the oven with the light on BUT ONLY AFTER you turn the light on (without adding the starter but place an oven thermometer in there), wait an hour, then check the temperature to make sure it is only around the 80-85º mark, max 90º. If it’s hotter (90 – 100º+) you can still do it, just prop the oven door a bit with a rolled up towel or stick a spoon in it to leave a small gap. Check this again after an hour and see what the temp is. Once you’re in that sweet 80-85º range, you’re good to go. Now put the starter jar in and it should help get the yeast & lacto moving a fair bit faster. Before you leave it in there DO THIS: Tape a large note on the oven knob/button that says “WARNING: Starter is in the oven; do not turn it on while starter is in there!” or something of the sort. The last thing you want is someone unknowingly pre-heating the oven with the starter in it.
• NOTE: If your oven has a “proofing” setting DON’T USE IT unless you’ve checked it (empty) after about 30 minutes and confirmed it gets no more than 90ºF. This setting most often is much much too warm (I’ve seen 140º!) to proof anything, ever.
• Same deal, but in the microwave: boil some water, place in a cup. Place cup and starter in microwave. The hot water will warm the oven nicely for a while. Repeat as required. SAME WARNING: Stick a note on the microwave digital pad so no one turns it on. Less likely since people usually open the door, put in the soup or whatever THEN start it. But just in case…
• If you have some equipment (don’t have to be in the kitchen!) that is motorized and always on (TV, computer, espresso maker, etc.) and it’s a bit warm, this may be enough rise in temperature next to it that it will help the starter. Also check if the top of the water heater is warm without being too hot. Look around the house for other potential equipment that’s willing to share the warmth.
• If you have a table lamp with an incandescent light bulb – and a goose-neck lamp is ideal – turn it on and set the starter next to it. The bulb alone may warm the space near it enough. In the case of a gooseneck lamp, point it down towards the jar BT you may need to place something on the top the the heat doesn’t actually cook the top of the starter.
• Check to see where the cat likes to sleep during the day. It’s probably warm in that area.
• Find other clever places that are a bit warmer most of the day in your house where you can stash the starter. Don’t limit yourself to the kitchen.
All that said, even if you keep the starter at ~65º it WILL eventually get there, it will just take longer. And no, it’s not likely the rye’s fault; people make starter with bleached white processed flour successfully; you can do it with your rye flour. It will get there. Until then, keep ADDING feed to the starter (you may need to use a larger container for now) so you’re not reducing the smaller population of critters. Once it goes all gangbuster, then you can cut it back to a more normal quantity in a smaller jar.
Take this test of your patience in a positive way. Much of good bread making requires patience so if you can get passed this, you’ll understand that these little critters don’t wear watches and get where they get to when they get there and not before. They don’t check any timetable to see if they’re at a stage they are “supposed” to be at. Learn and accept this as part of bread making. Bread is “slow food” or at least really good bread is. Embrace the process. Understand that patience is the unwritten yet vital ingredient in any good bread formula.
And you may well get up this morning and find your starter is all beautifully bubbly. Then you can move on to “stage four”, having moved passed the bigger hurdle many new starter parents go through.
Well its almost feeding time and there’s finally almost 50% growth. As it happens, today was upper 70’s lol
Hi Paul,
Can I continue feeding it with rye flour till day 7,
or is it necessary to feed it with UAP ?